
Assembly Instructions - Koto, the Moss Habitat
Welcome to the new world of vertical grow cradles with Koto!
This planter is unlike anything you've ever experienced, and we're here to make sure your first foray into this new direction of growth is as smooth as possible.
Plant selection and preparation:
This habitat is meant to be used in a couple ways, as a vertical growing medium, and as a tabletop or horizontal planter.
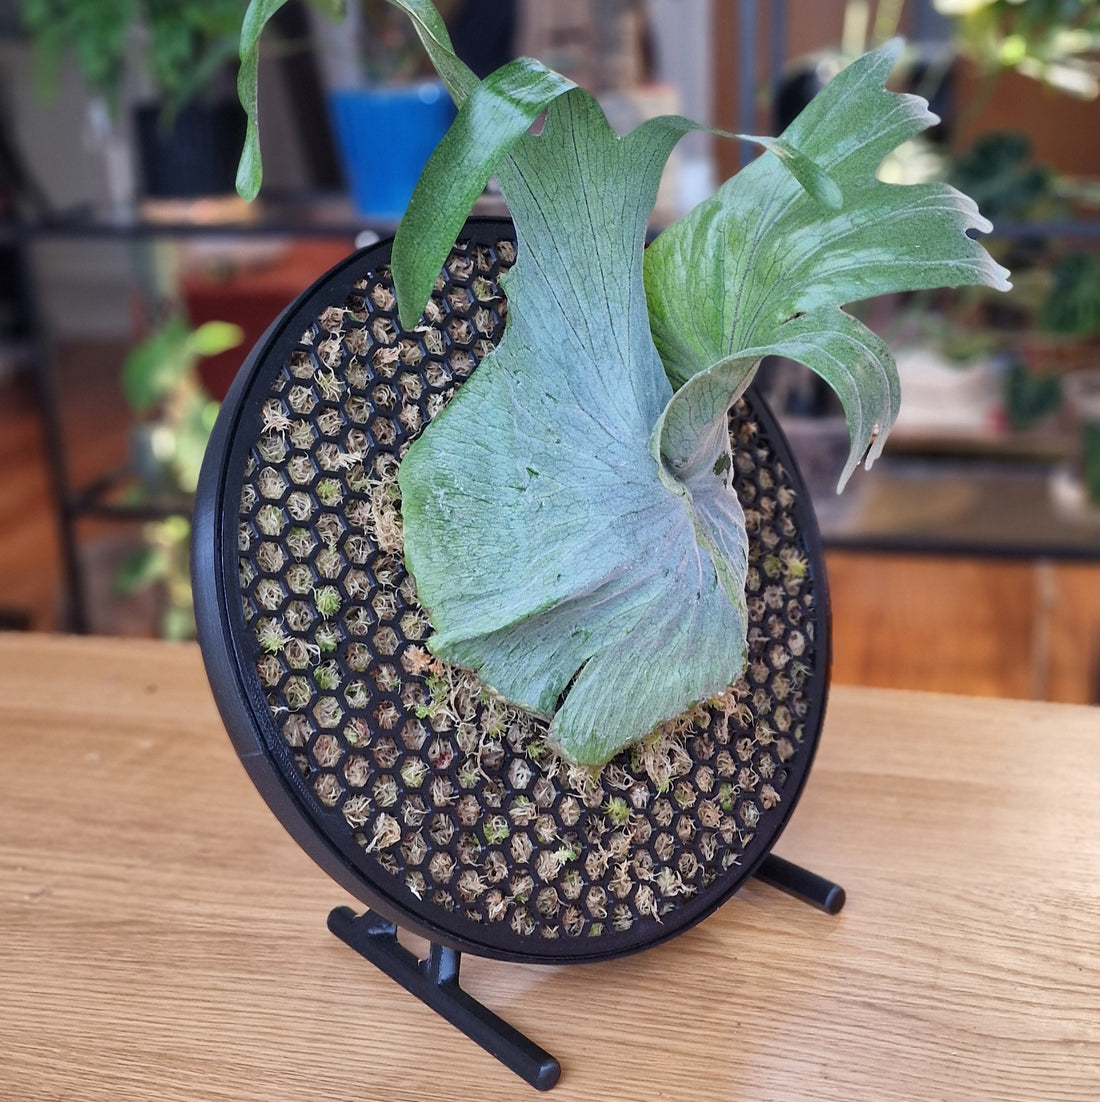
Standing upright on its optional legs, or hanging on a wall, is the first way we can use this habitat to display your plants. Many plants are found growing on the sides of trees or walls in nature, and as we are bringing these plants in from their natural environment, we intend to provide the optimal growing conditions to ensure the plant thrives as it would in nature.
Platyceriums are one such genus, a collection of various types of fern that will cling to the boughs of trees via tufted roots, and feed off the water and nutrients caught in antler-like fronds.

While fairly drought resistant, thanks to the protective sheath formed by it basal fronds, we thought to increase the potential for moisture and nutrient storage by attaching the plant to a large volume moss habitat, instead of the conventional plank.
Orchids are another good option, specifically epiphitic orchids, with their long aerial root systems that are perfect for gripping the vertical system.
As a tabletop or horizontal planter, there is no real restriction to which plants can be potted up in this system, though due to the assembly not being fully water-tight, plants that require a very damp substrate should be avoided to prevent leakage. Crawling philodendron, such as the Gloriosum, can be potted up in a substrate of mixed sphagnum and bark to form a beautiful centrepiece for your dining or coffee table.

This blog will use the example of a Platycerium Superbum to demonstrate the features and flexibility of the Koto as a growing medium.
To prepare your Platycerium, remove it from its propagation pot, and trim off the lower 1/3rd of the root mass, the spongy dark substance that lives beneath the fronds.
If transferring directly from a plank, nothing must be done other than aesthetic trimming where needed.
Attach plant to frame:
Place a couple handfuls of sphagnum moss on the outer face of the Koto. The amount and shape will vary depending on the size of your plant, as you will place the freshly trimmed roots of the Playcerium on top of this mound, and you will want to ensure there is enough volume to shape the fronds as you intend.

The Superbum forms a quite striking bowl shape with the overlapping fronds, so be prepared to pad the plant a ways off the surface with enough moss to allow the future fronds to grow over the existing ones, preserving the bowl shape.
It is time to place the plant on the frame. IMPORTANT NOTE: the top of the frame is marked by a little arrow printed into the back side of it :
It is important that you orient the plant with the antler fronds pointed towards this arrow, as you want the Playcerium to continue growing up, with the antler fronds playing the part of outstretched arms.

With some strong fishing line, or similar thread, secure the plant to the surface, weaving in and out of the hexagon holes as needed, until the plant is quite firmly fixed to the frame. NOTE: the fern will eventually push roots through into the moss frame, and fasten itself securely, but this will take time, and the heavy plant should not be at risk coming off the frame. Don't worry about visual damage to the existing fronds, the plant will push out new ones that will cover up the old.

The back remains empty and open to ensure you are able to easily manipulate the plant and line, securely fastening the Platycerium.
Fill the frame with substrate:
With the plant attached to the front of the frame, you will now want access to the back of the frame to fill and seal it. In order to prevent damage to the plant while you do this, you can create a tripod with some stackable cans to rest the edges of the planter on when flipped over, so the plant hangs under the frame:

The frame can now be filled by your choice of substrate. In the example a live sphagnum only mix was used, but you may choose to add some orchid bark, large form perlite, or coco fibre mixed in with the moss. Do keep in mind the size of the openings on the face, you dont want your substrate to filter out the openings when it is hanging on your wall, so make it a very chunky mix.

Sealing the frame:
You are ready to move on to closing the frame. The back cover and the frame come together smoothly, as long as there is no debris blocking the joint. Align the arrows printed on the cover and frame, to ensure the antler fronds continue to grow upwards.

With the cover in place, and the arrows aligned, you are ready to screw in the provided screws, using a Phillips head screwdriver (Pz2 fits best). These screws cut the threads into the plastic, so take care not to screw and unscrew unnecessarily, as the holes will wear out. A light finger pressure is enough to tighten the screws, don't use too much force to prevent breaking the plastic.

Wall mount or legs:
If you mean to wall-mount the Koto, use a ruler to mark the wall with the correct space between mounting points, then use fasteners (make sure you choose the right type for your wall material) or command strips and hooks to mount the frame on the wall. Ensure the method you use is sufficient for the weight of the Koto, as moist moss can be quite heavy, and you don't want to put your plant (or wall) at risk.

To use the legs included with your Koto, simply slot the square pegs into the square holes in the back of the Koto, then push the legs towards the top of the Koto to lock them in place. The square pegs should slide along the rails (it is a bit tight), and stay firmly in place when locked.

The little rubber feet can remain on regardless of display method, and if using the Koto horizontally, will keep the base stood a slight ways off the surface, protecting it.


