
How to attach a Monstera to a moss pole
Got a moss pole and not sure how to attach your Monstera to it? We’ve got the perfect blog for you! To properly train your Monstera to a new moss pole, follow our guide covering some essential steps and techniques.

Much depends on the type of moss pole you are using
How you attach your Monstera plant to a moss pole will vary depending on whether you are using a coco coir pole or a sphagnum moss pole or trellis. We have included advice for both below, and this advice will probably be applicable for just about all the moss pole types out there.
Regardless of what kind of moss pole you have, keep in mind the following:
- Be patient: do not rush your plant. What you are doing is actually "training" your Monstera to find the moss pole itself and climb up it independently!
- Not every plant will take to the moss pole, so let it "do its thing" without disturbing it for awhile to see if it finds the setup to its liking.
- Get the right moss pole size for your plant so that the plant is not dwarfed or swamped by the moss pole.
Position your plant before attaching it to the moss pole
Begin by identifying the growing patterns of the plant, and defining the future direction of growth. Most plants will instinctively grow upwards towards the light, though if the plant has previously grown unsupported it may have adopted a "crawling" shape and will need to be incrementally trained to grow upright once more.
Monstera is a popular moss pole plant due to its shape. Most of the plants in this genus share a biological consistency, namely that of having a "front" and a "back" of the stem. Petioles that connect the leaves to the stem will grow from the "front", usually alternating left and right on the same "front", providing a wide canopy that overlaps as little as possible, to absorb the most light.

On the "back" side, most Monstera will begin to grow little (at first!) aerial roots, their feet or grippers that will help attach the plant to its tree in nature, allowing it to climb out of the jungle to better reach the sunlight.

This side of your plant should be oriented towards the moss pole, to prevent the plant having to twist on itself and redirect its roots.

If you are potting up a plant that has not previously had the support of a moss pole, you'll need to give your plant a helping hand to help it attach to the support.
Gentle is best, consider repotting mature Monsteras
A gentle approach is usually best, avoiding bending or twisting the stems, particularly if you have a mature Deliciosa with a very rigid stem. Once very developed in one direction, it may require a repot, where you rearrange the roots completely, to help it go from a crawling grower to a climber.
Fun fact: In nature you will often find these climbing Monstera snaking across the jungle floor, looking for a tree to climb! While in this form, they have longer (leggy) vines, and smaller leaves - kind of like a Monstera Adansonii when left in a basket to hang!
Anchor your moss pole
Once you have identified the direction of growth, and decided on a position for your pole, it is time to anchor your coir or moss pole.
Your coir pole will likely include a sharpened stake that can be gently pushed into the soil, twisting as you go to prevent damaging the roots too much. As you are going in blind, there is not much you can do to prevent root damage outside of a full repot.
For a Sphagnum moss pole, you'll have the option of doing a full repot, with an anchor or simply burying part of the pole, or use our ScrewStake to gently twist the pole into the soil, with the spiral pushing roots and soil out of the path of the stake.
Fastening your Monstera to train it
Then comes the initial fastening step. The plant will initially be unable to support its own weight with whatever aerial roots it has pushed out so far, so you will need to fasten the stem to your pole. This can be done using string, wire, alligator hair clips, or plant tape (a kind of velcro, also known as hook and loop). Beware that you only fasten the stems of the plant, not the leaves or petioles, and you should only tie them very lightly, not tugging or snagging the plant.

Moisture is the moss pole secret sauce
The next part is MOISTURE! You have an organic surface, whether you are using a coir or moss pole, and that is enough to tell you plant to get climbing. But if you want it to truly thrive, you will need to add water to the mix, as these little aerial roots will really only grow in size if they are fed.
This is where the biggest difference between coir and sphagnum moss poles becomes clear: coir as a substrate holds moisture very poorly, requiring hours soaking to absorb any amount of water, drying out very quickly afterwards. This makes it extremely inefficient as a method to hydrate your plant and its environment, even though it will fulfil all the other requirements like support and organic surface.
Sphagnum moss can hold up to 20 times its own weight in water, making it the clear winner for root hydration. Once those roots sense the moisture that you have tied them to, they will reach out and do the rest.

Same plant, a few weeks apart.
Once you have your plant positioned and hydration within reach, you'll find that your plant will do the rest, with only minor aesthetic rearranging necessary from you.
Our favourite method: attach the Monstera using green tape (velcro)

As explained in our moss pole blog here, we like to attach our Monsteras using small strips of green gardening tape. This tape is a hook and loop material similar to velcro and it is super soft on the plants.
We like this method as it's fully flexible and adjustable, and the gardening tape is relatively inexpensive and much softer on stems than wire or rope. It can also be reused several times, which is a huge plus.
The tape comes off as soon as the plant has latched on, but the extra push to bring the nodes close to the moss will speed up that rooting.
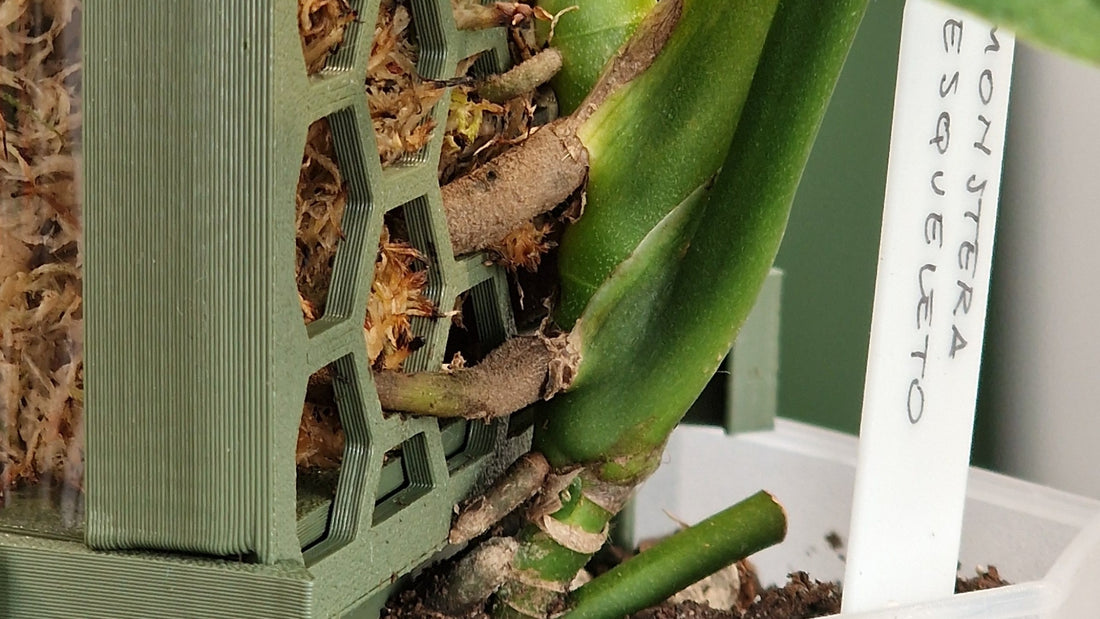
You may need to do nothing

With smaller Monsteras, you may not have to really "attach" the plant to the moss pole at all. In the picture above, you can see that we have only gently taped the stem to the bottom of the moss pole at the soil line. As it is a young plant only just beginning its growth, bringing it close to the moss pole will be enough to ensure it latches on quickly.
Larger Monsteras with multiple stems may require more velcro and positioning, but we don't recommend dragging your plant into complex shapes, as the stems are not as flexible as those of, say, a hoya.
The attaching will happen with time
Monsteras love moss poles and will grow aerial roots that will grow into your moss pole (having moisture in your moss pole will speed this up as mentioned). So with time, your Monstera plant will become more surely attached and enmeshed with the moss pole, and you won't have to do anything.
Secure the moss pole
One of the main benefits of using moss poles is that they provide climbing and vertical support for your plants. You will want to ensure that your pole remains vertical, as moss poles have a tendency to become top heavy very quickly!
Some external support will inevitably be necessary, but not to worry, we've got you covered. Another good method to keep your moss pole from tipping over is to hang it via a wire anchored into your ceiling.


